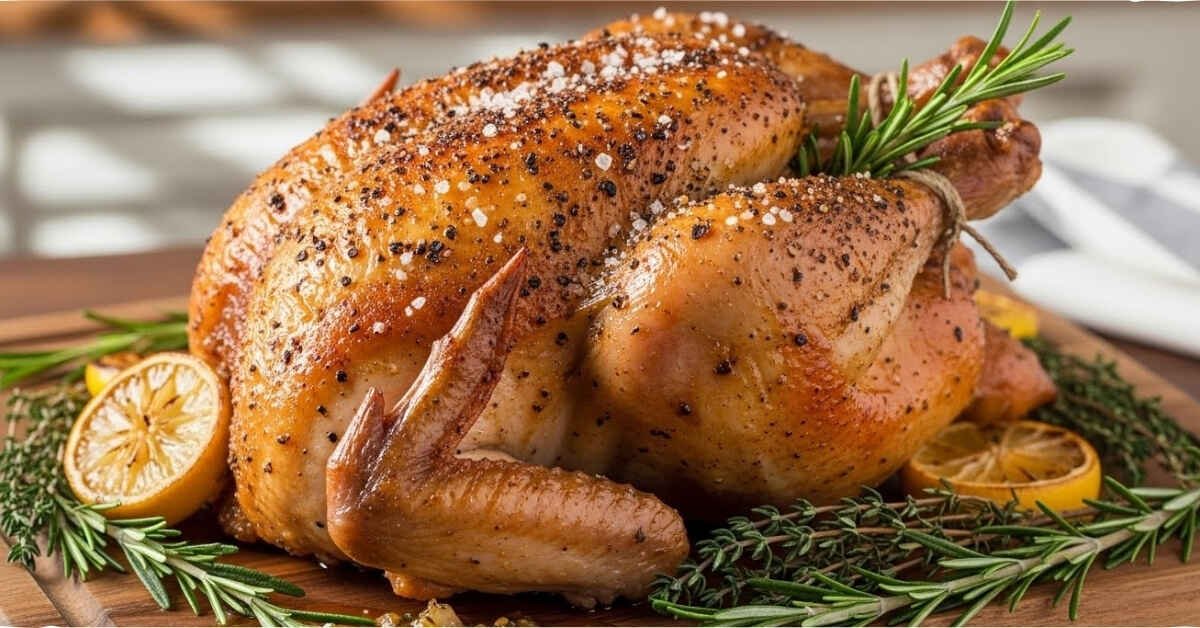
Master the Salt and Pepper Technique for Guaranteed Crispy Skin and Juicy Meat
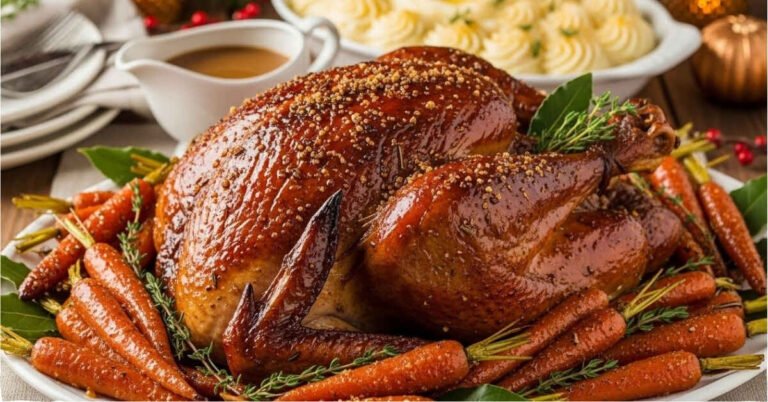
Few dishes rival the simple elegance of a roast chicken. The flavor is pure. This Crispy Roast Chicken recipe proves this fact. You do not need dozens of ingredients. Instead, you master the right technique. Specifically, you apply coarse salt and fresh pepper precisely. High-heat roasting is then combined. Therefore, a skin that shatters with crispness is unlocked. The meat remains incredibly tender. The chicken is guaranteed juicy.
This guide is comprehensive. It uses a minimalist approach to seasoning. Specifically, it uses salt and pepper. This method is elevated with scientific precision. The result is an ultimate weeknight hero. It is also a Sunday centerpiece. Furthermore, it is a beginner-friendly masterpiece. It relies entirely on dry brining power. Strategic temperature management is also used. Follow these steps. You will achieve unforgettable Crispy Roast Chicken perfection every single time.
Why Only Salt and Pepper?
These two simple ingredients become powerful cooking agents. This happens when they are applied correctly. Firstly, coarse salt is essential for the dry-brining process. Furthermore, freshly ground pepper provides aromatic depth. Consequently, the rich, natural flavor of the Crispy Roast Chicken is allowed to truly shine through. Guide to Salt Types
Crispy Roast Chicken Science: Why Guaranteed Results Are Achieved
Mastering this dish is about understanding the simple chemistry of heat, moisture, and salt.
The Power of Dry Brining for Crispy Roast Chicken
Dry brining is the most crucial step. This step achieves both tender meat and Crispy Roast Chicken skin.
- Osmosis and Moisture Control: Coarse salt draws moisture out of the skin and meat. This happens through osmosis. Indeed, this drawing out is immediate. Next, the surface moisture dissolves the salt. Thus, this creates a concentrated saline solution.
- Reabsorption and Seasoning: Following this, the muscle fibers re-absorb the saline solution. Specifically, the solution moves into the muscle fibers. Importantly, this seasons the meat deep inside. Moreover, the proteins retain more moisture while cooking. In short, then, you achieve guaranteed juiciness.
- Skin Dehydration:You place the chicken, uncovered, inside the refrigerator. For this reason, you allow surface moisture to evaporate. Above all, this complete dehydration is the secret. As a result, the skin truly crackles. Otherwise, the skin would steam. Consequently, it would turn leathery in the oven.
High-Heat Roasting Strategy
Our dual-temperature approach is designed to balance browning and internal doneness.
- Initial Blast ($230^\circ C$): The first 15–20 minutes use high heat. This creates an immediate, intense heat transfer to the skin. First, this triggers the Maillard reaction. This is the chemical process that causes browning and flavor development. Additionally, this heat quickly evaporates any trace moisture. Consequently, the skin sets into a crisp, brown crust.
- Temperature Reduction ($190^\circ C$): You reduce the heat after the initial blast. Therefore, the bird finishes cooking without burning the exterior. Furthermore, this ensures the internal temperature rises slowly and evenly. Moreover, this prevents the breast meat from drying out. Meanwhile, the thighs finish cooking completely.
Ingredients: What is Required for Crispy Roast Chicken
The ingredient list is minimal, making ingredient quality paramount.
| Component | Ingredient | Quantity | Notes |
| Protein | Whole Chicken | 1 (1.8–2 kg) | A smaller bird is easier to cook. It cooks more evenly. Also, the giblets must be removed. |
| Seasoning | Coarse Sea Salt | 2–3 tbsp | Coarse salt is crucial. It is essential for the dry brining process. |
| Seasoning | Freshly Ground Black Pepper | 1–2 tbsp | Use freshly ground pepper. This gives optimal flavor and heat. |
| Fat (Optional) | Melted Butter or Olive Oil | 1 tbsp | The fat is for rubbing on the skin. This happens just before roasting. It enhances browning. |
| Aromatics (Optional) | Lemon (halved), Thyme/Rosemary sprigs | As needed | Aromatics are placed in the cavity only. This adds moisture. It also provides a subtle fragrance. |
| For Pan Sauce | Chicken Broth or Dry White Wine | $120 \text{ ml}$ ($1/2$ cup) | The liquid is used for deglazi |
Roasting: How Crispy Roast Chicken Perfection is Achieved
Follow these steps precisely to achieve that coveted golden skin and juicy interior.
1: Dry Brining for Crispy Roast Chicken
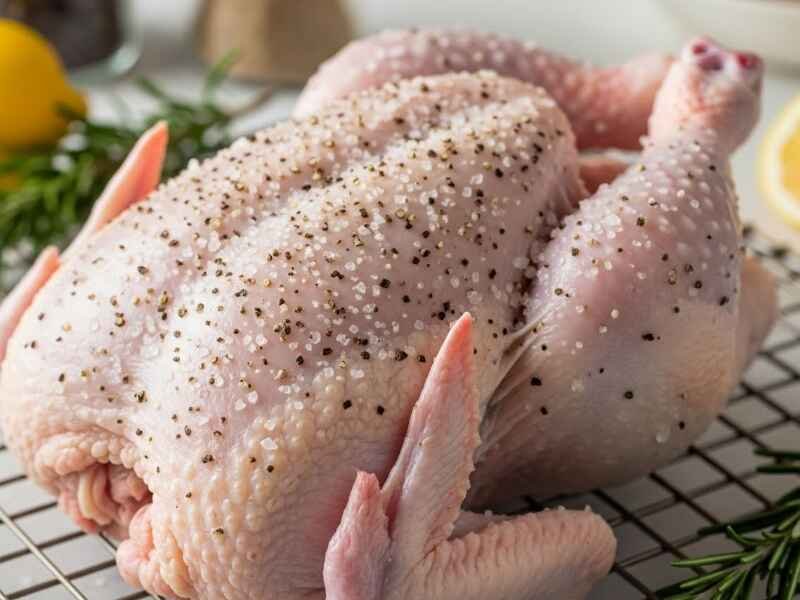
- Pat it Dry: Remove the chicken from its packaging. Using paper towels, pat the chicken aggressively dry, inside the cavity and all over the skin.
- Season Heavily: Combine the coarse salt and freshly ground pepper. Generously rub the mixture into every surface, ensuring full coverage, especially under the wings and inside the cavity.
- Dry Brine: Place the chicken on a wire rack over a roasting pan. Refrigerate, uncovered, for a minimum of 6 hours, and ideally 12–24 hours.
- Pre-Roast Prep: One hour before cooking, remove the chicken from the fridge to reach room temperature. Preheat your oven to a high temperature: $230^\circ C$ ($210^\circ C$ fan/gas 8).
2: Roasting the Crispy Roast Chicken
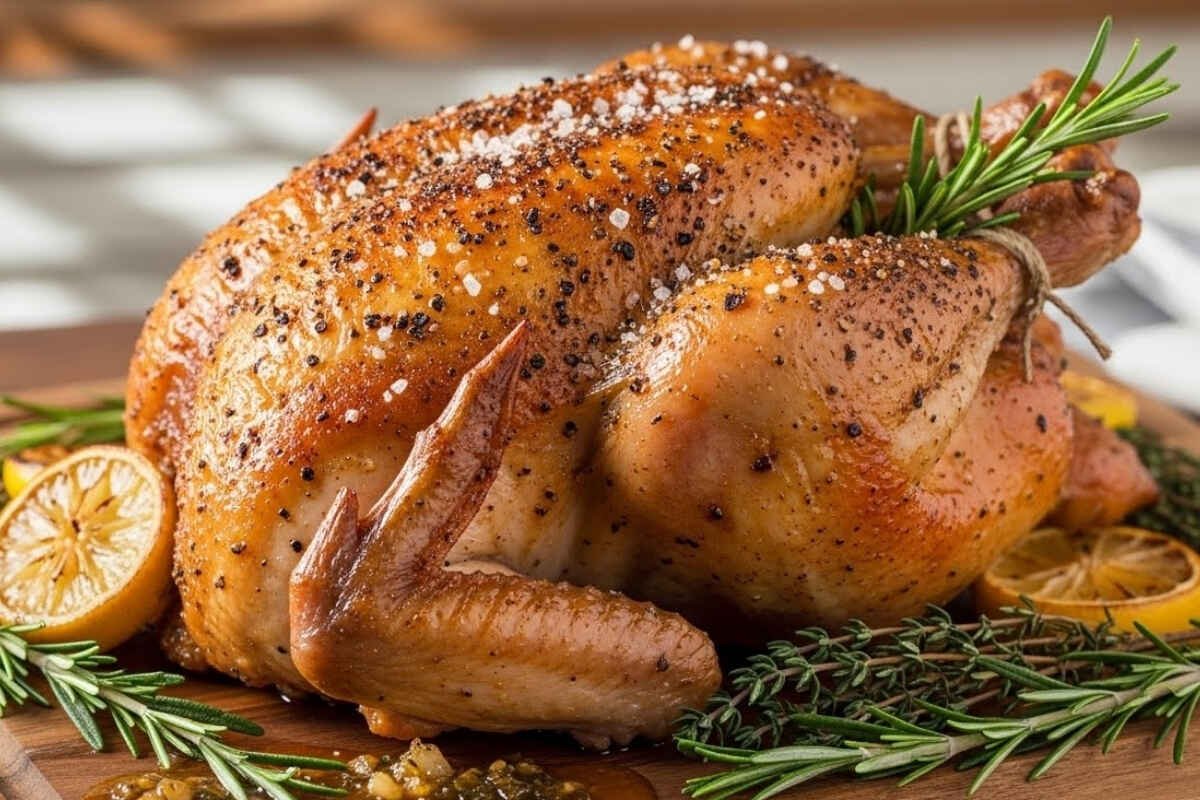
- Prep: Lightly truss the legs together with twine (optional). Rub the skin with the melted butter or olive oil.
- Initial High-Heat Blast: Place the chicken in the preheated $230^\circ C$ oven and roast for 15–20 minutes.
- Lower and Finish: Reduce the oven temperature to $190^\circ C$ ($170^\circ C$ fan/gas 5) without opening the door. Continue roasting for another 50–70 minutes.
- Monitor Temperature: The chicken is done when the digital thermometer registers $74^\circ C$ ($165^\circ F$) in the thickest part of the thigh (avoiding bone).
3: Resting and Serving the Crispy Roast Chicken
- Rest Crucially: Immediately transfer the finished Crispy Roast Chicken to a cutting board. Tent it loosely with foil and rest for 15–20 minutes. This step is non-negotiable for juicy meat.
- Carve and Serve: Follow the carving guide below and serve immediately with the pan sauce and sides.
Troubleshooting: Crispy Roast Chicken Results Are Guaranteed
| Problem | Cause | Solution |
| Soggy Skin | Too much surface moisture or bird resting in its own juices. | Always use a rack. Ensure the chicken is fully patted dry and rested uncovered in the fridge for at least 6 hours. |
| Dry Breast Meat | Overcooked; usually happens while waiting for the thighs to finish. | Check the temperature earlier. Tent the breast with foil if it browns too quickly. |
| Pale Skin | Oven temperature too low or not enough fat/sugar. | In the last 5 minutes, increase the temperature to $250^\circ C$ (if safe for your oven) until the color deepens. Rubbing with oil/butter helps. |
| Meat is Dry After Resting | You cut the meat too soon. | Ensure you rest for the full 15–20 minutes. Cutting early releases all the internal moisture. |
Serving & Enhancements for Your Crispy Roast Chicken
A perfect Crispy Roast Chicken deserves equally excellent sides.
Simple Pan Sauce from Drippings
Use the flavorful fond (browned bits) left in the roasting pan to create a quick, savory sauce.
- Deglaze: Place the roasting pan on the stovetop. Use medium heat. Pour in $120 \text{ ml}$ ($1/2$ cup) of liquid. This can be chicken broth or wine. Scrape up all the browned bits. Use a wooden spoon.
- Thicken & Finish: Thicken & Finish: Whisk in $1 \text{ tbsp}$ of butter. $1 \text{ tsp}$ of flour is optional. Let the sauce simmer for 2 minutes. This reduces it slightly. Then, strain it. Season with salt and pepper to taste.

Complementary Side Dish Mini-Recipes
1. Garlic and Herb Roasted Potatoes
- Toss $1 \text{ kg}$ quartered Yukon Gold potatoes with $3 \text{ tbsp}$ olive oil, $1 \text{ tbsp}$ chopped rosemary, $4 \text{ cloves}$ minced garlic, salt, and pepper.
- Roast alongside the chicken during the last hour (at $190^\circ C$), stirring once, until golden brown and tender.
2. Lemon-Almond Green Beans
- Blanch $500 \text{g}$ of fresh green beans for 3 minutes until bright green. Plunge into ice water.
- Sauté $2 \text{ tbsp}$ butter and $1/4 \text{ cup}$ sliced almonds in a skillet until fragrant. Add the beans, a squeeze of fresh lemon juice, and a pinch of salt. Toss for 1 minute until heated through.
Non-Alcoholic Beverage Pairings
Select drinks that are refreshing and slightly acidic to cut through the richness of the roast.
- Sparkling Cider: A crisp, tart apple flavor with high carbonation acts as an excellent palate cleanser.
- Ginger Beer: The natural spice and high carbonation offer an invigorating, savory contrast.
- Tart Lemonade/Iced Tea: Simple, classic options that should not be overly sweet.
Storage: How Crispy Roast Chicken Should Be Stored
Maximize the value of your Crispy Roast Chicken by properly storing and utilizing every last piece.
- Refrigeration: Cool completely, then store carved meat in an airtight container for up to 3–4 days. Store meat still on the bone for best flavor retention.
- Freezing: For long-term storage, remove the meat from the bone, chop or shred it, and freeze it in airtight bags or containers for up to 3 months.
- Reheating: Avoid the microwave, which turns breast meat rubbery. To retain moisture, wrap sliced meat in foil with a splash of broth or gravy, and warm gently in a $160^\circ C$ oven for 10–15 minutes.
- Leftover Ideas: Use shredded chicken for quick tacos, hearty chicken noodle soup, or classic chicken salad sandwiches. Don’t discard the carcass, it’s perfect for making homemade chicken stock. (Internal Link 2: Link to a “How to Make Chicken Stock” recipe)

Frequently Asked Questions (FAQs)
| Question | Answer |
| How long does a 2kg chicken take to cook? | It typically takes 1 hour and 15 minutes. This is at our two-stage temperature. The time is after the initial high-heat blast. However, always trust the thermometer reading. It must be $74^\circ C$ ($165^\circ F$). |
| Why must the chicken be uncovered in the fridge? | This is a necessary part of dry brining. Leaving the chicken uncovered allows surface moisture to evaporate. This process is dehydration. Ultimately, this is the key. It achieves that crunchy Crispy Roast Chicken skin. |
| My skin is crispy, but the meat is dry. What went wrong? | This nearly always means the chicken was cut too soon. The 15–20 minute rest is non-negotiable. If you carve before resting, the internal pressure pushes out the juices. This leaves the muscle fibers dry. |
| Can I use fine table salt instead of coarse salt? | Yes, you can use fine salt. But, use half the amount (1–1.5 tbsp). Fine salt dissolves much faster. Therefore, you risk oversaltings the bird. Coarse salt gives you more control. |
| Should I wash the chicken first? | No. Rinsing raw poultry is unnecessary. It can spread bacteria (salmonella). This bacteria spreads around your sink. The process is cross-contamination. Patting it dry is sufficient. |
Conclusion
The Crispy Roast Chicken you mastered is the ultimate example. It shows that cooking well is about intentional simplicity. You focus on essential techniques. For example, use the perfect dry brine. You also use the strategic high-heat roast. Furthermore, you practice the patient rest. These steps move you beyond guesswork. You can now guarantee a juicy, savory meal. It is crowned with shatteringly crisp skin. This is the bedrock of confident cooking. This will become your favorite staple recipe.
Crispy Roast Chicken: The Ultimate Salt and Pepper Recipe
Ingredients
- 1 Whole Chicken 1.8–2 kg. Remove giblets.
- 2-3 tbsp Coarse Sea Salt Essential for the dry brining process.
- 1-2 tbsp Freshly Ground Black Pepper Use freshly ground for optimal flavor.
- 1 tbsp Melted Butter or Olive Oil For rubbing on the skin just before roasting.
- Lemon (halved) or Thyme/Rosemary sprigs Place in the cavity to add moisture and subtle fragrance.
- 120 ml Chicken Broth or Dry White Wine 1/2 cup, for deglazing the pan.
Method
- Phase 1: Preparation and Dry Brining (6–24 Hours Ahead)
- Pat it Dry: Remove the chicken from its packaging. Then, it must be patted aggressively dry using paper towels. Specifically, the skin and cavity must be dried.
- Season Heavily: Next, the coarse salt and pepper are combined. The mixture is generously rubbed into every surface, ensuring full coverage, especially under the wings and inside the cavity.
- Dry Brine: Afterward, the chicken is placed on a wire rack over a pan. It is refrigerated, uncovered, for a minimum of 6 hours, and ideally 12–24 hours.
- Pre-Roast Prep: The chicken is removed one hour before cooking. This allows it to reach room temperature. The oven is preheated to 230°C (210°C fan/gas 8).
- Phase 2: Roasting
- Prep: The legs can be lightly trussed with twine. The skin is rubbed with melted butter or oil.
- Initial High-Heat Blast: First, the chicken is placed in the 230°C oven. It is roasted for 15–20 minutes.
- Lower and Finish: Then, the oven temperature is reduced to 190°C (170°C fan/gas 5). Roasting continues for 50–70 minutes more.
- Monitor Temperature: Finally, the temperature is monitored. The chicken is done when 74°C (165°F) is registered in the thickest part of the thigh (avoiding bone).
- Phase 3: Resting: The chicken is transferred to a cutting board. Tent it loosely with foil and rest for the full 15–20 minutes. This step is non-negotiable for juicy meat.